Sunday, December 21, 2014

Ashtanga Yoga


If you are tired and stressed, try the short Ashtanga Yoga videos on Sonima. I have practiced Ashtanga for the past year, although its not what I teach (yet). I find it very effective for reducing my stress level and calming me down. A full practice of the Ashtanga Primary Series (there are six - the image above is of the Primary Series) can take 1 1/2 to 2 hours. Traditionally, it's taught in increments. As the student gets stronger, additional poses are added to it.

R. Sharath Jois, the grandson of Ashtanga Yoga founder, K. Pattabhi Jois, is teaching Ashtanga exactly that way on Sonima.

Bookmark this page: http://www.sonima.com/author/r-sharath-jois/

Start here with 10 minute yoga: http://www.sonima.com/live-fit/10-minute-yoga-class-sharath-jois/

There's three things you should know. You want to focus on:
- your breath
- root lock and abdominal lock (pulling the pelvic floor and abdominal muscles in)
- eye gaze
Also known as Ujjayi breathing, Bandhas, and Drishti.

More about all three here: http://www.ashtangayoga.info/ashtangayoga/basics/breathing-ujjayi/

For information about traditional Ashtanga teachings, go to: http://kpjayi.org/

You will not regret beginning this practice. It will do wonders for you.

Coming up: THE BEST NEWS EVER!!!!!!!!!!!!!!!!!!!!!!!!!!!!!!!!!!!!!!!!!!!!!!!!!!!!!!!!!!!!!!!!!!!!!!
Share/Bookmark

Wednesday, November 19, 2014

Peace Out Chocolate Cake


Peace Out Chocolate Cake (really a Peace Out Pie) from Stacy Stowers' book Eat Raw Not Cooked  is terrific. The crust is similar to a cookie. The filling is not like a pudding, it IS a pudding. Putting the pie in the fridge overnight hardens the pudding to create a pie that won't fall apart.


I am really, really happy about this one. I didn't put raspberries on it like Stacy does (raspberries shaped into a peace sign). It doesn't need it. Below is the recipe.

Ingredients:
1 1/2 c. raw walnuts
1 c. pitted medjool dates
1/3 c. raw cacao powder
1 tsp. vanilla
1 pinch salt
For the chocolate mousse topping:
1/4 cup agave
1 tsp. vanilla
1 1/2 avocados (3/4 cup)
1/3 cup raw cacao powder, pure BLISS
1/4 cup water
Directions:
Process in the food processor with the “S” blade until mixture sticks together. You can add a tiny amount of water if needed to moisten your mixture. Don’t over process or you will make nut butter. Pat mixture into an 8 in. round cake pan.
For the chocolate mousse topping: Simply blend in your blender. Top your cake with chocolate mousse and decorate with berries for Peace Out Chocolate Cake!

I love raw desserts. None of the bad stuff like sugar, flour, butter (or worse margarine). Only all of the good stuff like nuts, dates, raw honey, fruits, avocado, coconut oil, and spices. Yummy!

Love,
Althea ◦
Share/Bookmark

Thursday, November 13, 2014

Caramel Apple Pie


Simply put, the caramel apple pie from Lisa Viger's Raw on $10 a Day is a perfect balance of sweet, creamy, and crunchy. The recipe is here:
http://www.rawon10.com/2011/12/caramel-apple-pie-perfect-for-holidays.html


If you look at Lisa's picture, the caramel is on top of the pie. I didn't put the caramel on top because I wasn't sure if Jona would eat it. He didn't want it anyway because he is the picky eater. I placed the caramel in a jar to pour over the pie once it's cut into individual pieces.


I had never made a caramel sauce before. It's a combination of almond butter, agave. olive oil, and water. I was super pleasantly surprised at it's creamy sweet richness. Good stuff.

I also learned that if you overprocess walnuts and raisins (the crust), it turns into an oily, inedible mess. I had to throw my first batch away. I was trying to take pictures of Jona making the crust in a food processor. Turned out I left the walnuts and raisins in the food processor too long. They got warm, runny, and icky. Only process until the walnuts and raisins start to stick together.  (And I didn't get any pictures of Jona because my camera needed new batteries .)


Raymond and I tore that pie up. He asked for it everyday when he came home from school. So this pie is kid-approved too!


Take the time to make it. It's perfect for the holidays. You'll love this pie :-).

Love,
Althea ◦
Share/Bookmark

Wednesday, November 5, 2014

Harmony Spinach


Another easy salad for you all!

Harmony Spinach 
from The Joy of Living Live by Zakhah

1 bunch spinach
1/4 cup sesame oil
1 tablespoon ginger, peeled and chopped fine
2 garlic cloves, chopped
2 tablespoons maple syrup
2 tablespoons liquid aminos

Wash the spinach, remove the stems, and chop. Put into a big mixing bowl. 
Mix in the other ingredients and serve. This rocks. Subtle flavor and goes 
well with any Asian-inspired dish.


Love,
Althea ◦
Share/Bookmark

Live Collard Greens


Rather than cook your collard greens to the point of disintegration, try them raw :-). Rubbing any kind of oil into greens will break them down and make them soft, as if the are cooked. I made raw collard greens based on my friend Chef Skai's recipe. Skai never measures her food. Lucky for ya'll, she's got a video on You Tube showing how to make these greens. They are a perfect balance of sweet, sour, bitter, pungent, and salt.

Chef Skai demonstrating how to make collard greens:
https://www.youtube.com/watch?v=KDxyrme-X9s

Live Collards (V, GF)

Ingredients
collards
garlic
onion
sea salt or Braggs Liquid Aminos
maple syrup, grade B
olive oil

Roll up the collards, and cut them into thin strips. Put into a large bowl. Add the other ingredients.

Use your hands to mix the ingredients together. Put your love and energy into the food! All of this is to taste. I prefer lots of garlic, but you might enjoy less. Start with small amounts of everything, because once you put the ingredients in, you can't take them out! Let me know what you think of the greens.

Love,
Althea


Share/Bookmark

Sunday, November 2, 2014

Black-Eyed Pea Salad


At the Washington, DC Black Expo in 2000 or 2001, I sampled a Black-Eyed Pea Salad offered by Vertamae Smart-Grosvenor. She is a culinary anthropologist, and best known for her PBS show and her books Vibration Cooking: or Notes of a Geechee Girl, and Vertamae Cooks Again.

I never forgot that sample. It's tastiness shocked me. I had never considered beans, especially black- eyed peas, as the star of a salad. How good could it be? Bad ass good, it turned out. I believe she said she used Italian dressing in hers. Whatever the ingredients, if it's been over ten years since I ate something and I still remember it, then that is one hell of a food memory.


I was craving this salad last week. There's plenty of versions of this on the internet. I chose the Neelys version, then changed it a bit after reading the reviews. This is their original:
http://www.foodnetwork.com/recipes/patrick-and-gina-neely/black-eyed-pea-salad-recipe.html
They use canola oil, sugar, and parsley. Olive oil tastes better. This salad does not need a lick of sugar. And cilantro reigns over parsley any day of the week.

This is my version:

Black-Eyed Pea Salad (V, GF)

Ingredients

1 large tomato, diced

1/2 medium red onion, finely chopped

1 small red bell pepper, finely chopped

1 jalapeno, finely chopped

2 tablespoons chopped green onions

2 tablespoons chopped fresh cilantro

1/4 cup unseasoned rice wine vinegar

1/4 cup olive oil

Salt and freshly ground black pepper

2 (15-ounce) cans black-eyed peas, drained

Directions

Combine the first 6 ingredients in a bowl.

In a separate small bowl, whisk together the rice wine vinegar, olive oil, salt and pepper.

Toss all together and let marinate for at up to 8 hours in the refrigerator before serving.

Twenty minutes is all it took to make this salad. Do leave it in the fridge for a few hours to let the flavors marry. Add some avocado for more body. You can even switch up the beans. Black beans would be good. Let me know when you all make it!

Love,
Althea


Share/Bookmark

Monday, October 20, 2014

Milk Kefir


Kefir is a natural probiotic drink. I am making all these homemade probiotics to get them in my son's guts. I am eating the cultured vegetables, and they are drinking the kefir. Now this is the VEGAN Mocha Angel, and full disclosure, I used whole milk because as a beginner to making homemade probiotic drinks, I wanted to start with with what was easiest. I will move to water kefir and kombucha, but for now it's milk kefir for the boys.

From Cultures For Health:

"When kefir grains or culture starter are added to milk the bacteria begin feasting on the
lactose, or milk sugar, in the milk. This feeding process produces byproducts such as lactic
acid, very small amounts of alcohol, and carbon dioxide, and also causes the bacteria and
yeast to reproduce and permeate the prepared milk kefir. The milk sugar also nourishes the
grains themselves, allowing them to grow and reproduce."

And here is the coolest thing about kefir, it's bacteria can colonize in the gut. Which means it sticks around inside of you forever. That's good stuff!

I used kefir grains from Cultures for Health only because a health store near my home carries it. A week later, I've made successful kefir everyday.

The first photo is what it looked like once cultured.


Above is the same kefir from above. See how it separates from the sides of the jar? Once the milk stops jiggling, I know the fermentation process is complete.


All you literally do is add kefir grains to milk. Above are the grains in milk. The yellowy thick balls are the grains. I didn't want to wash them off, again because I'm new to this. But I think they can be rinsed off. 


After I poured the milk in a strainer, separating the grains from the milk, above is what was left.


I was worried the boys wouldn't like it, but they did! I have to add strawberries and honey, but eat it they will! That's Jona eating it for the first time (it was a little thick, so he ate it like yogurt.) They have had it everyday since the first batch was finished. My goal is to get it into them everyday.

Love,
Althea ◦
Share/Bookmark

Saturday, October 18, 2014

How to Make Cultured Vegetables


Why ferment your foods?
1. They improve digestion.
2. They restore proper bacteria in the gut.
3. They are rich in enzymes.
4. They help us absorb the food we are eating.
5. It's inexpensive.
6. Fermentation improves the flavor of your food.

The simplest way to make cultured vegetables from scratch is with cabbage and sea salt. This is an easy version: Making Sauerkraut.

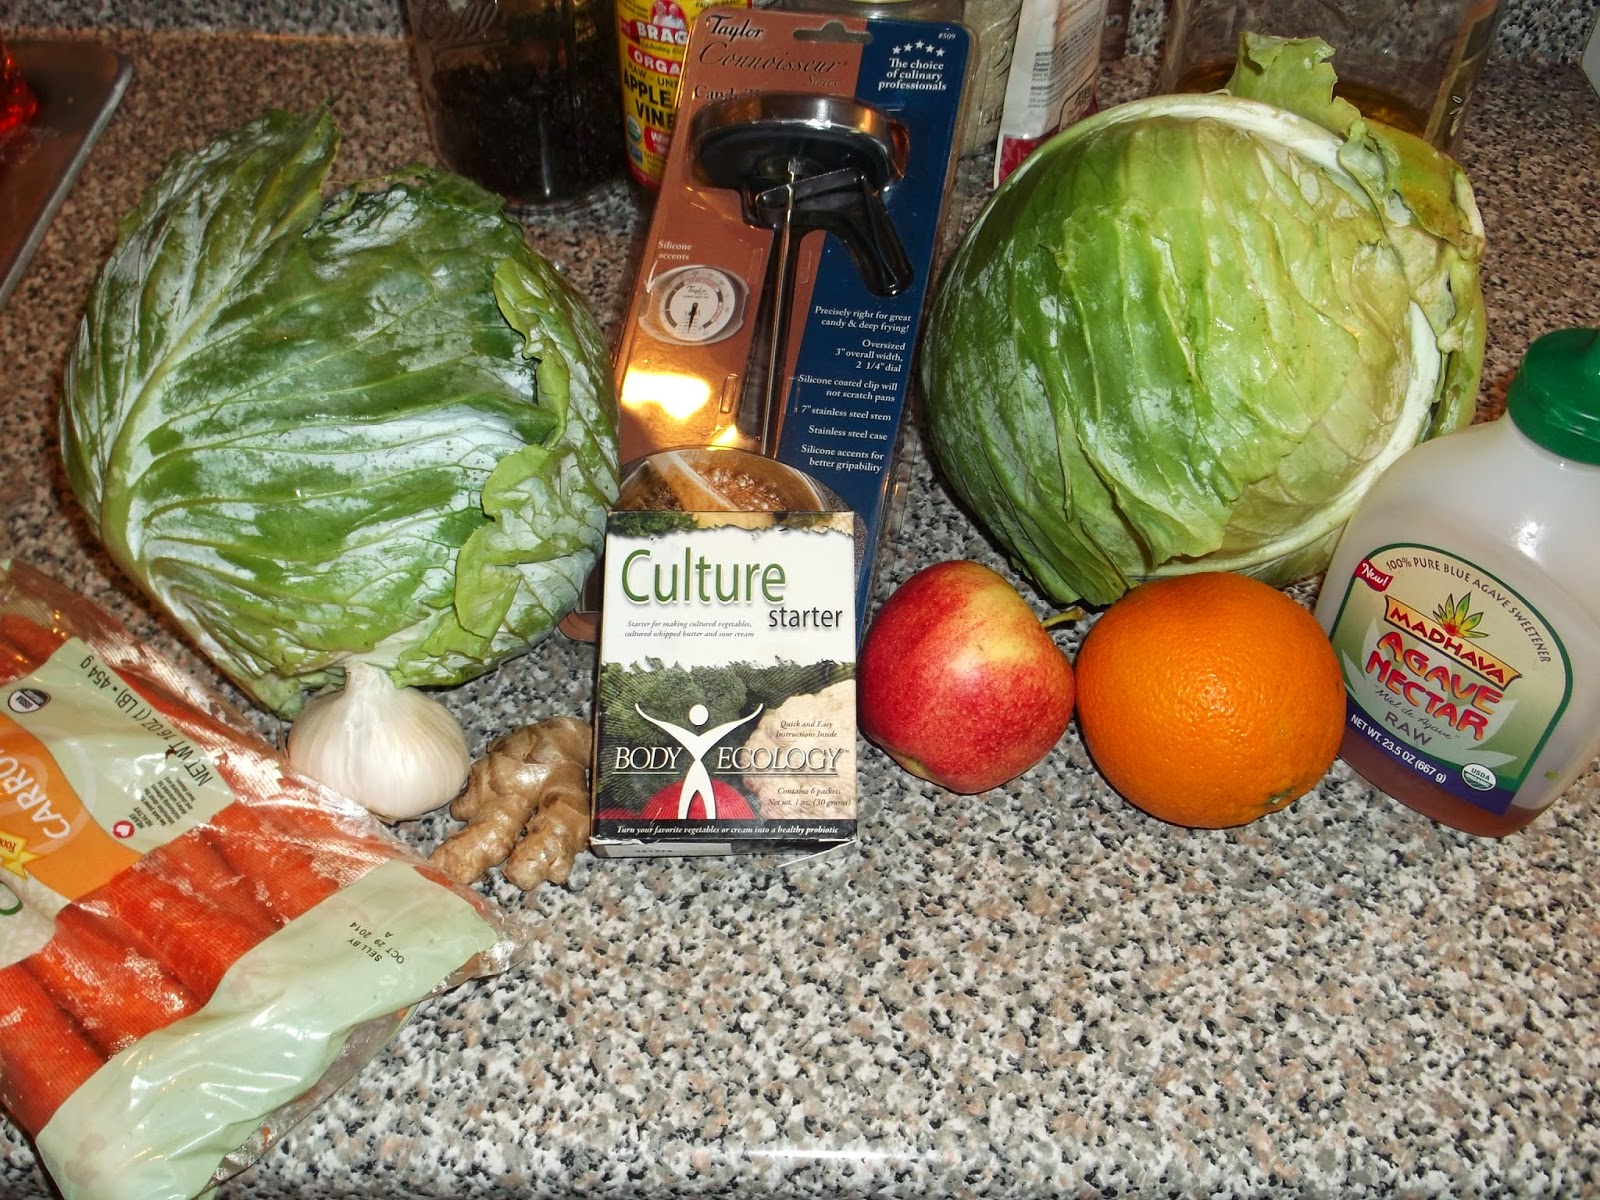
I had one packet of Body Ecology's Veggie Culture Starter left. I decided to use it before it expired.
Cultured Vegetable Starter contains the following beneficial bacteria:
Lactobacillus plantarum
Lactococcus lactis ssp. lactis
Lactococcus lactis ssp. cremoris
Lactococcus lactis ssp. diacetylactis
Leuconostoc mesenteroides ssp. cremoris

Lactobacillus kefyr Non-GMO dextrose as a carrier (consumed during fermentation)
One packet can be used for seven consecutive fermentations.

(And this is not an ad for Body Ecology or the Wild Fermentation site...only sharing information.)

In exactly 1 hour and 15 minutes, I made 2 different sets of cultured veggies. Cabbage, carrots, ginger, and garlic is the one on the left. Cabbage, orange, and apple is on the right.


First, put 1/2 cup of water, the culture starter, and a sugar source to feed the culture, in a small pot.


Heat to 90 degrees. Let sit for 20 minutes or longer. I bought candy thermometer, which I saw once I ripped it open, started at 100 degrees. I used my fingers to gauge. Ninety degrees is warm to the touch. This is going to be your brine.


While the brine is sitting on the stove, cut up your vegetables. I used my food processor to chop up everything.

Put all the veggies in a bowl. This is the carrot, cabbage, garlic, and ginger mix.


Take 2-3 cups of chopped cabbage, 1 cup water, the brine, and blend all together.


Add that liquid mixture to your veggies. Mix well with a spoon until it's all juicy


Pack into a ceramic or glass jar. The smell will stick to a plastic jar. And plastic chemicals can leech into your food. It's just best to stay with ceramic or glass. Plus, glass is pretty, and you can check on your veggies as they ferment without opening the jar. Above is cabbage, apples, and orange. See the cabbage rolls on top? I use them to pack the veggies down. Cultured food expands during the fermentation process. Allow 2 inches between the veggies and lid.


This is the cabbage, carrot, ginger, garlic veggies. I put all of my jars in my storage room, and covered with a towel. The hotter the room the faster they will ferment. The cooler the room, the slower they ferment. Give it 3-7 days in the spring, summer, and fall. Seven to ten days in the winter depending where you live.

I can smell the garlic without even opening my jars yet. I'll show you what they look like when the veggies are ready!

Love,
Althea


Share/Bookmark

Sunday, October 5, 2014

Teaching a Raw Food Class


I taught a raw food class on Saturday at Pathways to Whole Living, as part of their October Detox month. In the photo above, I am with Pathways Owner and Founder, Tracey Oliver-Keyser. If you don't know her, she is a phenomenal woman.

Tracey made a beet juice, with beets, carrots, and apples.


I made oatmeal, vanilla milkshake, kale salad, and tacos.


It was an interesting mix of people. All the food was great (yea!). I've taught two other classes there this year. Next up is Raw Desserts, most likely in November. When the date is confirmed, I'll let you all know.

Love,
Althea

http://www.pathways-belair.com/
https://www.facebook.com/pages/Pathways-To-Whole-Living/407667552625496 ◦
Share/Bookmark

Wednesday, August 27, 2014

Offering Readings on Fiverr

If you haven't heard of Fiverr, it's a marketplace for creative and professional services starting at $5.
I joined on Sunday night, offering Life Purpose Readings for $5. I've gotten 5 clients in 48 hours.

People offer services ranging from:

  • proofreading
  • jingles
  • voiceovers
  • book cover art
  • SEO reports
  • to anything you can think of.....

I am looking for at least 5 more people this week. If you were always wondering about my intuitive readings, and that side of me, this is the perfect place to jump in.

My link is here:
http://www.fiverr.com/althea372/do-a-life-purpose-reading-for-you

I spent a month researching Fiverr before I decided to do business with them. They have lots of checks and balances (like ebay or Paypal) to protect both buyer and seller. Here is what I like about it:

  • No one can randomly post a positive or negative review of your work, a la Amazon. Services must be purchased, and services must be delivered. There's room for mutual cancellation, and resolution.
  • You can add to your "Gig," as it's called, with positive reviews (Gig Extras). 
  • You can have more than one Gig.
I am telling everyone I know who has marketable skills. If you are looking for legitimate work from home, this is the place.


Love,
Althea ◦
Share/Bookmark

Wednesday, July 30, 2014

I'm on YouTube!

Guess who has launched their Mocha Angels channel on YouTube? Me!!

https://www.youtube.com/watch?v=YEslRk6UExQ

Leave a comment please :-).

Love,
A. ◦
Share/Bookmark

Sunday, July 13, 2014

Chocolate Cream Pie


I'm still alive :-).

More on us in a second. I have been making raw food again. I want to share this Chocolate Cream Pie from The Rawtarian. I love her site because the ingredients are simple. I keep looking for complicated recipes and their are none. I am a fan.

This photo is what was left of the pie. It went fast. I do recommend it and I'd make it again. It reminded me of a Fudgsicle. The recipe is here: http://www.therawtarian.com/raw-chocolate-cream-pie-recipe.


Since my last post, I went to see my cousin Christian graduate from Hampton University with a Master's Degree in Architecture.


The boys finished their first year in school. Both did great. Raymond ended the year with a 3.1 GPA. Jona's grades jumped by the end of the year to a 3.0 GPA. They are in camp now and loving it.


I got attuned to Reiki Level 2 on Saturday. It's been eight years since I took the first class. This was an amazing experience. I am happy and grateful.

Love,
Althea ◦
Share/Bookmark

LinkWithin

Related Posts with Thumbnails